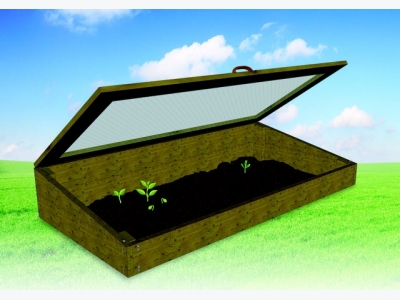
How to Build a Hot Bed

Illustrations by Cam Pauli
Back in the day, long before solar power became a buzzword, farmers found an alternative energy source in the horse manure that proliferated naturally on their properties. As fresh manure decays, it emits warmth ideal for sparking germination and giving seedlings a significant boost.
The best contraption for harnessing that heat is a simple, bottomless wooden box with a slanted glass top, oriented south to maximize the sun’s rays. Anyone with basic carpentry skills and access to a home-improvement store can replicate this version, with dimensions based on a standard-size window sash.
Materials
Three 10′-long, 5/4″ x 6″ treated pine decking planks, such as Naturewood
One 4′-long treated 2×4
One 3′ x 6′ window sash
50 wood screws (21/4″ #7 stainless steel)
2 T hinges (with provided screws)
1 gate handle (with provided screws)
Tools
Circular saw*
Power drill with assorted bits for attaching the lumber with screws
Instructions
PREPARE THE LUMBER. Use a circular saw* to cut the decking planks as follows: three pieces measuring 70″ long (for the front and back walls) and three measuring 36″ long (for the side walls); cut one 36″-long plank in half diagonally, creating two identical triangles (for the side walls). Next, cut the 2×4 into two 1′-long pieces and two 7″-long pieces for the corner posts. Discard all scrap.
BUILD THE BACK WALL. Align two long planks, long edge to long edge, against the taller corner posts, as shown; fasten with 2 screws at each corner of each plank, as shown.

BUILD THE FRONT WALL. Align one long plank with the two short 2x4s in the same way. Fasten with 2 screws at each corner of the plank, as shown.

ASSEMBLE THE FRAME. Align the two rectangular side planks to join the front and back walls, as shown, forming the frame. Fasten the side planks to each post with 2 screws at each corner of each plank, as shown. Finish by aligning the two triangular planks atop each side wall, so that the side walls slope from back to front. On the rear end, attach the planks to each post with 2 screws in each corner of each plank. On the top of each side wall, near the front, drive a screw through the triangular plank into the plank beneath it, as shown.
TRIM THE OVERAGE. Using the circular saw,* trim the posts to match the angle of the side walls, beginning in the lower left corner (see detail), and moving clockwise around the outer edge of the frame. Now, prepare the back wall to accept an angled lid: Using the circular saw,* carefully trim the back wall at an angle (sloping toward the front), using the angle of the side walls as a guide.

ATTACH THE LID. Center the handle on one long side of the window sash, as shown, and attach using the provided screws. Fasten the opposite edge of the sash to the back wall, using the hinges and provided screws, as shown.

How To Use This Hot Bed
Dig a roughly 2-foot-deep pit slightly wider than the hot bed. Fill the pit with a 4-inch-deep layer of coarse gravel for drainage and place porous landscape fabric on top. Cover that with a 12-inch-deep layer of fresh horse manure, then a 6-inch-deep layer of good, weed-free soil. Center the hot bed over the pit.
Prop the lid open a bit as the manure heats up to allow ammonia to dissipate, monitoring the temperature with a soil thermometer. When the temperature falls to the 85–95°F range, plant seeds or seedlings in the hot bed and close the lid to retain heat. Continue to monitor the temperature, aiming for 80–90°F during the day. Prop open the lid to cool things off; if a hard frost threatens, cover the closed bed with a blanket at night. Of course, water and care for the plants as you would normally.
Once you’ve transplanted the seedlings out, remove the spent manure and spread it elsewhere. Next spring, recharge the hot bed with a fresh supply.
*Power saws can cause serious injury. Follow the safety instructions in your owner’s manual and wear protective gear when operating.
Related news
 Cropped: Potatoes
 Poor potatoes. They are the humble workhorse of the vegetable world, usually taken for granted and often overlooked in favor of more exotic options.
 Cropped: Bananas
 Bananas grown in mountainous areas at an altitude of more than 600 meters (or .37 miles) are sweeter than those grown at sea level.
 How to Find the Season’s Best Berries
 With the hot, sticky summer months comes one of life’s greatest joys: Fresh berries, easily found in farmer’s markets across the country